Another great article by Kris at Scalemodelguide.com. This time, its on washes, and the difference between washes and filters. I’ll leave you in the more than capable hands of Kris from here.
The wash technique can enhance the surface details in many places as indicated by the red circles. From left to right: Panel line around hatch; grill; shadow around lift ring; ridges on jerry can and hinges on roof hatch.
Introduction
This tutorial sets out the theory and practice of using a paint wash to improve the appearance of a scale model. It includes a step-by-step guide on how to apply a wash. It also provides a comparision between a traditional ‘mix-it-yourself’ oil paint wash and ready made enamel wash from ‘MIG Productions’.
What Is A Wash?
A wash is a very thin paint mix. The exact proportions will vary depending on the effect required, but typically a mixture of 5% paint to 95% thinner would be used. Many types of paint can be used – oil, enamal, acrylic and even soluble water colours. However, the most popular type is made from artists’ oil paint, sometimes mixed with modeller’s enamel paint.
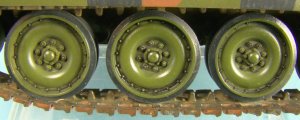
The wheels of this M113 APC lack definition and it is difficult to see the bolts and hub detail.
After a dark wash the wheels appear to have much more detail.
It is important that the type of paint used does not affect the underlying base paint surface. Therefore, if the model is painted with acrylics, the wash should be oil or enamel and vice versa. It is common to put a protective layer of varnish on the base coat of paint before applying a wash.
The purpose of a wash
The aims of putting a wash on a model are to enhance the surface detail increase the appearance of depth.
 The tracks on the right have received a wash of rust coloured paint.
The small size of models means that surface details may not be very visible. This is not just because the details are small, but because items like hinges and panel lines on the model will not cast shadows the way the full-size object would. To an extent, the wash technique is a little like painting shadows and darkness. It is complimented by dry brushing which aims to highlight raised areas.
The washing and dry brushing techniques when used together help to bring a model to life, add realism and create visual impact.
The difference between washes and filters
There is sometimes confusion between a wash and a filter.

MIG productions make a series of ready-to-use washes based on enamel paint.
Like a wash, filters are layers of highly thinned paint. However, that is the only similarity between them. A wash is aimed at selective parts of a model to make areas that should be dark look darker. As such a wash is normally applied to small areas on a model with a small brush and will be allowed to flow along panel lines.
A filter is intended to affect the entire paint surface equally and subtley change the colour and tone. Thus a filter will normally be applied very sparingly with a large area brush. The aim of the filter is to apply it evenly over most if not all of the model. A wash will normally be darker than the base colour, whereas a filter is likely to have the same tonal value i.e not darker or lighter, but will be a different colour. A filter is sometimes used to blend different camouflage colours together, or tone down the base coat.
Furthermore, a wash needs to be applied to a gloss or semi-gloss surface, whereas a filter is best applied to a matt/flat finish.
Step-By-Step Guide
Originally, modellers had to mix their own washes from normal modeller’s or artist’s paint. However, there are now ranges of ready made washes available. In the following step-by-step guide we shall use both a traditional oil paint wash and a ready made enamel wash from MIG Productions.
Paint washes do not have to be restricted to your model. A wash is also good for giving depth to scenery, figures and in fact, any surface where there is a distinct texture or raised details.
The photograph on the left shows a wash being applied to a pebble that was found in the garden and is being used as a rock on a display base.


